The Exploding Engine Extravaganza
| Instant wiki maker | Making handouts | Editing tips |

Biology In Elementary Schools is a Saint Michael's College student project from a course that ran between 2007 and 2010. The student-created resources have been preserved here for posterity. Link under 'toolbox' for printer-friendly versions of the exercises. Click on handouts to print full resolution versions. Please see Wikieducator's disclaimer, our safety statement, and the Creative Commons licensing in English and in legalese.
Student worthiness
tried and trusted
Primary biological content area covered
- Force
- Chemical Reactions
- Newton's Third Law of Motion
Materials
- 1 empty two-liter bottle, marked at 3 cups when standing upright.
- 1 hole less cork that fit the opening of the bottles
- 4 tsp of baking soda (per bottle)
- squares of toilet paper
- 3 cups of lemon juice (per bottle)
- rubber bands
- safety glasses
- gloves
- chalk
- measuring tape
- chart paper
- measuring cups and measuring spoons
- 4 wheels of the same size, 2 rods that can fit in the wheels to be used as axels, a flat surface to put the bottle on (will be used to make some sort of 4-wheel object)
- writing utensils / markers
- 1 funnel
- A board to place behind the engine.
- paper towels
- scissors
- toilet paper
- tape
- marking flags (could be used to mark how far the car went)
<kaltura-widget kalturaid='5flfxnrqz4' size='L' align='L'/>
Handouts
Figure 1: used to demonstrate the use of charts and graphs with this experiment

Description of activity
Student will create engines using plastic 2 liter soda bottles, baking soda, and lemon juice. They will measure the distance that the cars travel and compare the data with that of their peers. This will help them understand the law of conservation, force, and chemical reactions. Students will create a table and a graph to display the data collected from the experiment.
Lesson plan
Prepare
- Make sure you are outside when you do this! It will be messy!
- Explain to the students that they will be making an engine and briefly explain what the basic definition of an engine is (A machine that converts energy into mechanical force or motion.).
- Have students put on gloves and safety goggles for protection. Quickly remind your students of some safety tips:
- Do not eat either the baking soda or lemon juice.
- Stand clear of the rocket when it’s ready for launch (after the baking soda is added to the engine).
Make the Engine
1. First take 2 squares of toilet paper, and put one teaspoons of baking soda on it. Fold the sides of the toilet paper around the baking soda to make a little packet. Do this four times so that you have four packets.
2. make sure your goggles and rubber gloves are on!.
3. Put the plastic funnel into the 2 liter bottle.
4. Pour 3 cups of lemon juice into the bottle or until the lemon juice reaches the height labeled on the bottle. Then have the students figure out how many cups they used to fill the bottle up to the label.
5. Attach the bottle to your car (the car can be made out of anything such as a matchbox car or legos). To attach the bottle large rubber bands work best.
6. Make sure that the board is set up (as seen in the video) so that the rocket will have something to push off of when it takes off.
7. Draw a chalk line where the rocket will begin when it takes off.
8. Quickly drop the baking soda packet into the soda bottle, put the cork tightly into the opening of the bottle, shake the bottle, and set it on the ground at the chalk line.
9. Step away, and prepare to see the rocket explode!
10.Then draw a line where the rocket lands after it explodes. Next, have the students measure the distance between the two chalk lines and record on their handout. (You can have multiple groups of students do this experiment and compare the lengths that the bottle traveled)
11. After, be sure to pick up whatever mess is made on the sidewalk, rinse off the car, and the soda bottle.
Wrap-up/Discussion
- What is a chemical reaction and how does it relate to your bottle engine?
- A chemical reaction is a process in which one or more substances are changed into others.
- The chemical reaction in the bottle is between the lemon juice and the baking soda. This reaction produces a gas that is called carbon dioxide.
- How does this chemical reaction make the bottle engine move forward?
- This gas (carbon dioxide) pushes both on the cork and the inside of the bottle.
- When the cork is still in the bottle, the cork and the bottle are pulling on each other and keeping each other still. This pulling or pushing that is occurring inside of the bottle is considered a force.
- When there is enough gas pushing inside of the bottle, the cork and the bottle are able to break free from one another and go in different directions.
- The board is used as a force to stop the cork. Since the cork cannot move anywhere, the bottle is forced to move forward away from the cork. If the board had not been used then the cork would have been the object to move instead of the bottle because the cork weighs less than the bottle.
- What is Newton's 3rd Law of Motion and how does it relate to our bottle?
- Newton's 3rd Law of Motion states that for every force there is a reaction force that is equal in size, but opposite in direction. Whenever an object pushes another object it gets pushed back in the opposite direction equally hard. This explains the forces of the bottle and the cork acting upon one another.
- How does this differ from a bottle rocket that is shot up into the air?
- Gravity acts differently depending on if the bottle engine is launched on its side or up into the air.
- When the bottle is launched on its size there is friction caused by gravity pulling the bottle down and the ground pushing up on the rocket. These two forces cause friction which as a result causes the rocket to slow down.
- Gravity does not work directly to slow down the bottle like it does when the bottle is launched into the air. It works through friction.
- Picture Gallery
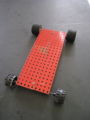
Figure 1: the car that the bottle is going to be attached to
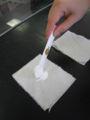
Figure 2: putting one tsp of baking soda onto two pieces of toilet paper
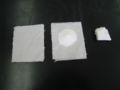
Figure 3: toilet paper; baking soda on toilet paper; baking soda/toilet paper packet
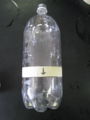
Figure 4: the marker on the bottle for the lemon juice (equals 3 cups)
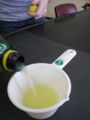
Figure 5: pouring the lemon juice into a one cup measuring cup
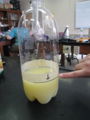
Figure 6: lemon juice filled up to the marker on the bottle
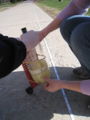
Figure 7: attaching the bottle to the car using large rubber bands
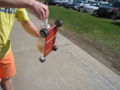
Figure 8: putting the baking soda into the bottle
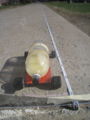
Figure 9: how the bottle should be placed before it takes off
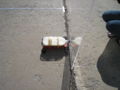
Figure 10: chemical reaction between the baking soda and the lemon juice


Potential pitfalls
- The lemon juice reacts to the baking soda quickly; one potential pitfall could be that it might explode before the cork is covering the bottle opening. Working quickly is a must! This is why the ingredients must be measured out ahead of time!
- When the rocket explodes it may not go in a straight line, so it would be more difficult to obtain an accurate measure of the length that it travels.
Math connections
- Students will measure the amount of lemon juice that they are putting into the bottle.
- Students will fill in a chart on the handout (Fig. 1) based on their data that is collected from their experiment. They will record their group number and the distance their bottle traveled.
- Also on the handout, students will graph the distance their bottle traveled. The graph will allow the students to compare their distance with that of the other groups. The chart and the graph display two ways of collection data for an experiment.
Literature connections
- Mitton, Tony. Roaring Rockets (Amazing Machines). New York: Kingfisher, 2000. See it on Amazon.com
- Colicutt, Paul. This Rocket. Farrar, Straus and Giroux, 2005. See it on Amazon.com
Connections to educational standards
7.12.c. Observe and describe the behavior of gases in containers (e.g., pumps, balloons);
7.12.d. Apply forces to objects (e.g., inertia, gravity, friction, push and pull), and observe the objects in motion;
Next steps
- students can try different substances (such as Pepsi & mentos or vinegar & baking soda) to see which reaction makes the bottle go further. Different chemical reactions between different substances can also be discussed.
- students can use the scientific method in order to guess which substances will make the bottle go further.
- this can be connected to math by having the students learn how to convert inches to meters or meters to inches.
Reflections
This activity was so much fun! We arrived at the school to teach the lesson and realized that we forgot to bring the soda bottles but thanks to some quick thinking we able to use the lemon juice bottles instead. Group after group of students loved the activity and I think we got some serious science through to them. One of our classmates who had the students after us said they were talking all about those chemical reactions that happened inside the bottle! Unfortunately it was very windy the day of the activity and the place that we had to work with forced us to send out rockets up a slight incline so the rockets didn’t propel as far as they did in our test runs, but the students didn’t seem to care because the explosion that resulted from the chemical reaction was just as big and COOL. Totally successful activity, very easy to set up and a this students really understood the science behind it.