School of Art Digital Literacy/Semester 2 Weeks 1-6

The following list provides the content for Semester 2: Weeks 1 - 6 of Digital Literacy as taught by the Electronic Arts section in the School of Art, Otago Polytechnic
Contents
Timetables and Content
School of Art Digital Literacy - Mainpage
Semester 1: Weeks 1 - 6
Semester 1: Weeks 7 - 12
Semester 2: Weeks 1 - 6
Semester 2: Weeks 7 - 12
Philosophy of weeks 1-6
The primordial structural form in motion pictures is the film loop. This 6 week segment will extend the Digital Literacy student's work within time-based media. Initially you will form groups of four in order to collaboratively create a concept and produce a storyboard for a thirty second film loop. Using a MiniDV camera you will videograph the storyboarded concept with your group in the following week. Once the basic filming is completed you will return to your individual work processes, moving on from your use of Windows Movie Maker in the first semester to learn Adobe Premiere as an editing tool in order to craft your unique version of the loop. Weeks 4 and 5 will focus on audio creation, culminating in week 6 where you will compose and edit a sound track for the film loop you created in Week 3, posting it on your blog. This is worth 45% of your semester's work.
ASSIGNMENTS SEMESTER TWO
Assignment C. "Flick Flack"
In week 6 submit your final loop with sound design to an online video site, and link to your blog. 45% of final grade.
Assignment D. Remix
By week 12 install your work in one of the 5 screening spaces. 45% of final grade.
Workbook
10% of final grade. Either a digital or hardcopy workbook - maybe continue your blog...or return to paper. The workbook must document the conceptual and technical development for each week and distinct documentation of each assignment.
Week One - Loopy!
lecturer week 1,2 and 3 - David Green David Green
Loopy! | Week one will look at a variety of short video loops and introduce students to storyboarding for the purposes of creating a :15 to :30 second live action looping sequence. Students will divide into working groups of four. (These live action loops will culminate in finished films including individual sound designs in week 6.) By the end of this week, students will have:
|
Download a blank storyboard template here
Week Two - Roll Video!!
Roll Video!! |Week two introduces students to live-action videography. By the end of this week, students will have:
|
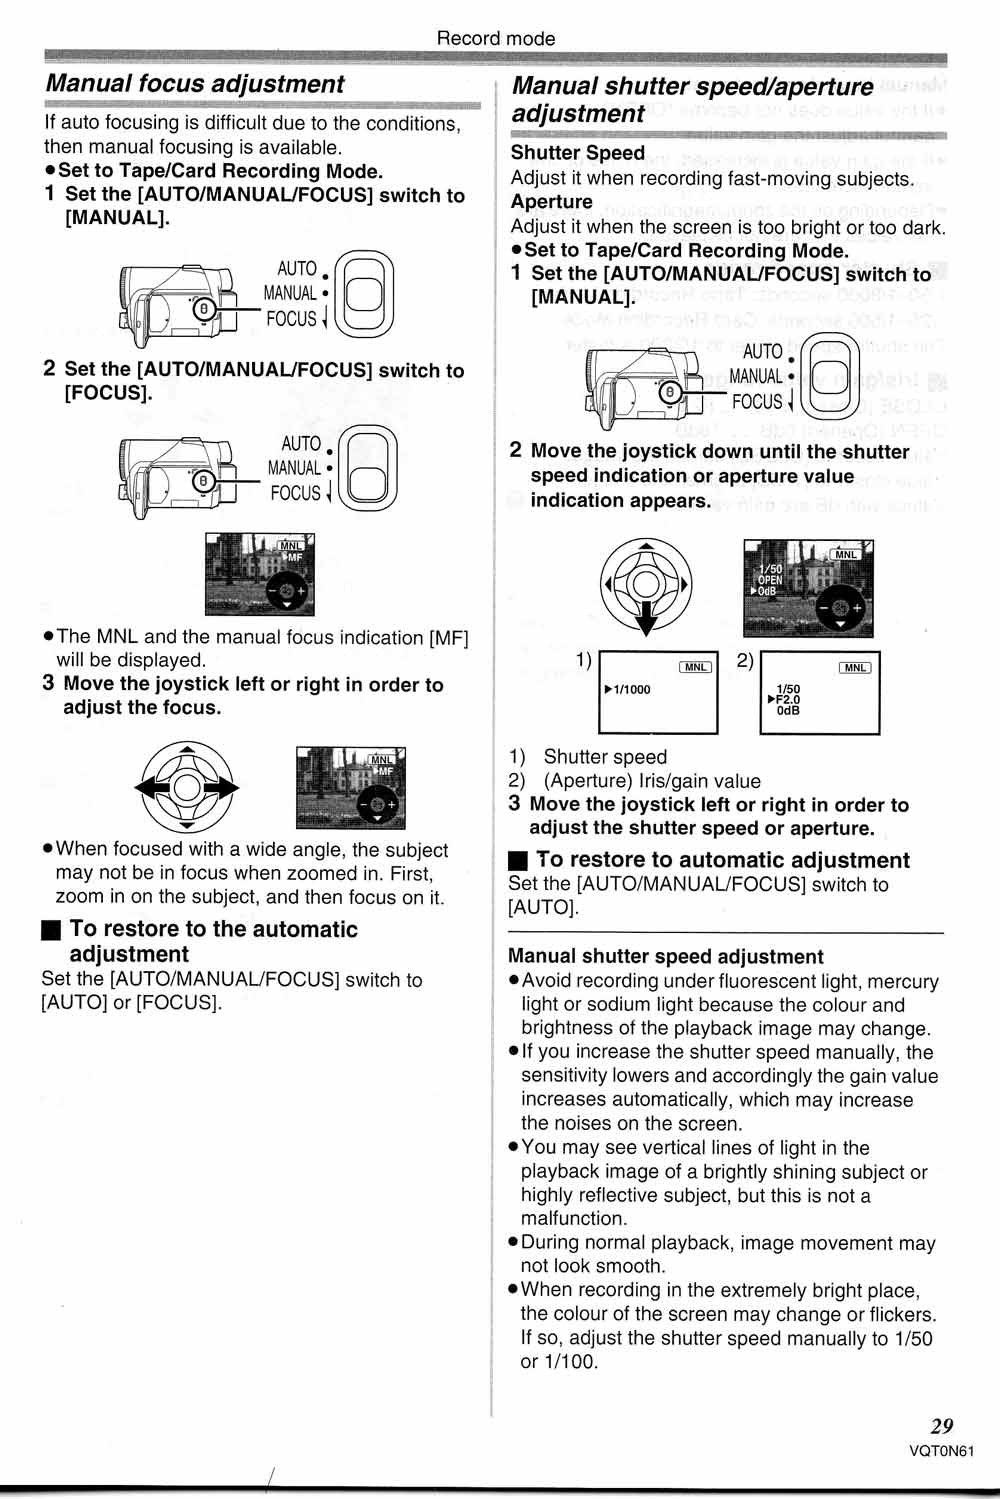
Download Focus and Exposure override for Panasonic NV GS75GN Camera
Download Focus and Exposure override for Sony DCVR-TR Camera
Download hand held camera illustrations
Download fire-wire capturing instructions
Capturing digital video through Adobe Premiere

Step A: Select Adobe Premiere from your program list.

Step B: Select New Project.

Step C: Select DV-PAL, Standard 48kHz, click "Browse", navigate to your "X" drive, name your project, and then click "ok".

Step D: When Premiere opens go to your "File" pulldown menu and select "Capture...".

Step E: When the capture screen appears click the "settings" tab at the top right. When the page opens click "browse" in the capture locations box for Video, navigation to your "X"-drive. Then do the same for Audio.

Step F: Next click the "Logging" tab on the top right of the capture control box. Name the clip you are about to capture. Then use the controls at the bottom to locate the specific footage you want to capture. When you find the shot, click the red record button to start recording and then click it again when you are ready to stop.

Step G: A "pop-up" screen will appear allowing you to note any details that you would like to tag with the take you are capturing. When you click "OK" the shot will be archived to your "X"-drive and you are ready to capture your next section of footage. If you capture, label and notate clearly and logically your editing process will be much more straightforward.
Note: Please capture only as much source material to your "X" Drive as you believe you will use for your edit and no more than FOUR MINUTES in total. (Please note: I mistakenly said 10 minutes in the lecture.) You can always go back to your source tape and capture alternative takes if you find you need to.
Week Three - Cut!!!
Cut! | In the week three lecture we will survey editing projects using Adobe Premiere featuring a selection of first and second year student work from our School of Art archives. In the labs we will demonstrate basic use of Adobe Premiere. By the end of week three students will have:
|
Week Four - I hear you!
lecturer week 4 and 5 Michael Morley Michael Morley
I hear you! | This week will build on knowledge learnt in the preceding moving image weeks by looking at audio and sound art. Practical sessions will include looking at audio software such as 'Audacity' and 'Logic' and the use of sound with moving image work. By the end of this week, participants will have:
|
Week Five - I hear you 2!
I hear you 2! | This week will build on knowledge learned in the preceding moving image and sound editing weeks. Practical sessions will include further examination of audio software such as 'Audacity' and 'Logic' and the use of sound with moving image work. By the end of this week, participants will have:
|
Week Six - 'Flick Flack!'
lecturer week 6 David Green David Green
No room 201 lecture this week....Go straight to the Lab!
Completed Film Loops must be posted on your blogs by the end of week 6.
Put it all together compiling your :15 to:30 second film loop with audio of your own design. By the end of week six students will have:
|
Exporting digital video for the web through Adobe Premiere

Step A: Select Export from your File pulldown.

Step B: In the Export Settings Box: "Format" select "MPEG2"

Step C: In "Preset" select "PAL DV High Quality".

Step D: Click the "OK" button.

Step E: Navigate to your "X-Drive", name your movie file, and click the "Save" button.