Lesson 2: Clinical Assessment of Malaria
Contents
UNIT 2: CLINICAL ASSESSMENT OF MALARIA
Introduction
Welcome to the second unit on clinical assessment of malaria. In the last unit you learnt about malaria, its definition, causative organism, transmission, life cycle and clinical classification. In this unit we shall discuss the process which you should follow in order to make a correct diagnosis of malaria. But first, let us look at our objectives for this unit.
|
By the end of this unit you should be able to:
|
Components of Clinical Assessment in Malaria
In order to reach the correct diagnosis when dealing with malaria patients, we need to do what is known as a clinical assessment. This involves the following steps:
- History taking;
- Physical examination;
- Investigations; and
- Diagnosis.
Let us consider each step in turn.
Taking the patient’s history
During the clinical assessment of a patient, it is important to begin with history taking. Before you read on, attempt the following activity. It should take you about 15 minutes to complete.
| 1
What do you understand by the terms history taking? …………………………………………………………………………………… …………………………………………………………………………………… …………………………………………………………………………………… …………………………………………………………………………………… …………………………………………………………………………………… …………………………………………………………………………………… …………………………………………………………………………………… …………………………………………………………………………………… What are the components of medical history? ………………………………………………………………………………………… ………………………………………………………………………………………… ………………………………………………………………………………………… ………………………………………………………………………………………… ………………………………………………………………………………………… ………………………………………………………………………………………… ………………………………………………………………………………………… …………………………………………………………………………………………
|
Now correct your answers as you read through the following discussion.
History taking is the systematic inquiry into the patient’s or client’s life in relation to the illness. It is the process of obtaining relevant information from the patient or patient’s care taker (such as mother or father) for the purpose of making a diagnosis. We call it medical history. History taking in children is more detailed than in adults.
The following are the components of medical history:
- Identification data (Personal particulars, including age).
- Presenting complaint.
- History of presenting complaint.
- Past medical history.
- Treatment history.
- Family social history.
- Systemic review/review of other systems
In the case of children, the following additional information is important:
- Developmental milestones;
- Nutritional history;
- Immunisation history.
Let us now look at each of these components of medical history in detail.
- Identification data includes: Name, age, sex, ethnicity, religion, next of kin, residential address and date of seeing patient in the health unit. As you may notice, information on age and area of residence is important as far as epidemiology of malaria is concerned;
- Presenting complaint: The presenting complaint is the problem(s) that has caused the patient to come to the health facility for medical attention. It is important to establish the duration of the symptom/s (complaint). In case of more than one symptom ask which one came first, second and so on until the last one. You should then repeat these complaints in the correct order beginning with the one that came first. Note that there may be more than one presenting complaint. When writing the presenting complaint always use the patient’s or guardian’s words. For example, if the mother says that the child feels hot, then write: “the child feels hot”, avoid describing it as a high temperature .
- History of the presenting complain: this refers to any additional information which you gather from the patient or guardian about their symptoms. It is important to ask more questions like:
- “When did the illness begin?”
- “How did it start?”
- “Was it of sudden or slow onset?
- What was the sequence of occurrence of the complaints and how did they develop subsequently?
- Find out when the symptom began and whether they have been getting better or worse.
- You should also ask about associated symptoms, for example, ask a patient with difficulty in breathing if they have a cough; or a patient with diarrhoea if there is blood in the stool or vomiting. You can also ask about the nature of the fever, is it constant or on and off. Remember to ask and then listen until the patient or guardian has finished talking. Avoid interrupting as much as possible so that you can get all the information.
- Past Medical History: This is also important and you should ask the following:
- Whether the patient has had the same illness before? This information is important because some illnesses recur, e.g. convulsions;
- What other illness the patient has had in the past? This is to help you exclude the present illness from being a complication of previous illness.
- Whether the patient has been admitted before or has had a surgery or has chronic illness
- Treatment History: As you well know, many patients try other treatments at home before they seek professional help. It is always important to ask the patient what other treatments they have taken during the present illness before you embark on treatment. Also ask if the patient has any drug allergy.
- Family social history: It is important to obtain information about the health of the entire family. You should ask:
- If any one else in the family is sick;
- About the general health of other family members;
- If any death has occurred;
- Where and with whom the patient lives;
- If mother, father or both are alive and staying together;
- If diseases run in the family, e.g. sickle cell disease, asthma etc.;
- If family income is adequate;
- Whether the family has adequate source of food, water, etc;
- About the sanitary conditions.
- Systemic Review. Here you try to find out how the patient’s complaint has affected his/her feeding/drinking habits, respiration, daily activity, sleeping, gastro intestinal and urinary habits. Systemic review is important as it helps you to exclude symptoms about the disease in other systems or symptoms shared by many systems. The patient or guardian may also remember important symptoms they had earlier left out. During this review other concurrent problems may also be discovered.
As we mentioned earlier, you should also gather the following additional information in the case of children.
- Immunisation History: it is very important to ascertain the immunization status of every child. Ask every mother about the vaccinations the child has already received.
- Nutritional History: malnutrition is a risk factor for all types of illness, especially in children. Well nourished children rarely fall sick.
- Developmental History: All children achieve certain milestones as part of their normal growth and development. It is very important to ascertain whether a child has achieved important developmental milestones. Assess motor development, language and social behaviour at various ages.
- Antenatal History: Ask the following questions regarding the antenatal care and the delivery of the child:
- Did the mother suffer any illness during pregnancy?
- Was the delivery spontaneous or assisted?
- Was it a home or hospital delivery?
- Were there any complications during or after delivery?
Now proceed to do the following activity in relation to what you have learnt in the just concluded section on history taking.
| 2
A mother brings a 5-year-old child called Nathan to you. She says the child was well till five days ago when he developed fever and vomiting. What additional questions will you ask her? …………………………………………………………………………………… …………………………………………………………………………………… …………………………………………………………………………………… …………………………………………………………………………………… …………………………………………………………………………………… …………………………………………………………………………………… …………………………………………………………………………………… ……………………………………………………………………………………
|
I hope your list included the following questions.
- You start by asking for Nathan’s full identification details
- Then you ask the following questions concerning Nathan’s illness:
- How long has he had the fever and vomiting and the frequency?
- What is the nature of the fever? Is it persistent, intermittent or remittent? Does it occur during the day or night?
- Is he vomiting everything he takes? Is he vomiting blood? Is the vomiting associated with diarrhoea? Is he thirsty and eager to drink in spite of the vomiting?
- Has he had convulsions? If yes, do these convulsions occur at the peak of fever? And for how long do these convulsions take?
- Has he developed yellow colour in the eyes?
- Is he passing urine? What is the colour of the urine? How much of it does he pass and how frequently?
- Has he taken any medication since this illness started? If so, what medication?
- Has he had a similar illness before? Or any other illness? If yes, is there any medical record on previous medication?
- Is Nathan allergic to any drugs? Which ones if any?
- Is he coughing or getting easily tired? Are his feet swollen?
- Has the mother noticed any unusual behaviour in Nathan’s sleep pattern and level of consciousness?
- Is Nathan fully immunized?
- Has he had normal development since birth?
- Are there any diseases that run in the family, e.g. sickle cell disease? How many brothers and sisters does Nathan have? Are they all alive and healthy? What is the family source of income? Do the parents of Nathan stay together? How is the housing in their home?
These are some of the questions that you need to ask to get details of Nathan’s illness. Table 1 below gives you a summary of the key steps that enable you to elicit a good history. Always keep them in mind.
Table 1: Steps to Good History Taking
- Always greet the patient and/or caretaker, and ask them to sit.
- Establish good communication right from the beginning.
- Listen carefully to the medical history being given to you.
- Use the words the patient and/or caretaker, understands.
- Give the patient and/or caretaker time to answer the questions you ask.
- Ask additional questions when the mother is not sure about the answers.
- Use good questioning techniques – ask open-ended questions, avoid questions that lead to “yes” and “no” answers
- With babies and young children you should take history from parents or guardians. Older children can speak for themselves but you need to hear the parent’s story as well.
- A good and accurate history is the first and most important step in making a correct diagnosis.
History taking accounts for over 70% of the diagnosis. You should take it before you carry out a physical examination and treatment of all patients, except in extremely ill patients. This is because it may be necessary to carry out certain emergency resuscitative measures on the patient before you can take history.Let us now consider the second step in clinical assessment, that is, physical examination.
Physical Examination:
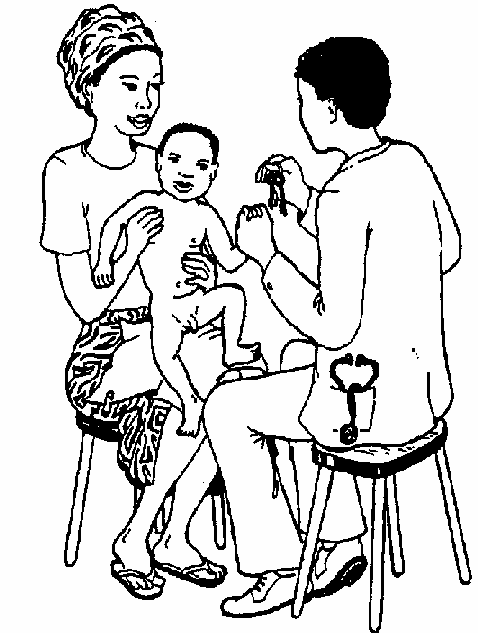
Conducting a physical examination is usually the next step after history taking. It is guided by the history that has been taken.
.
Before you proceed complete the following activity. It should take you 5 minutes.
Physical examination is a procedure carried out by a health worker on a patient in order to assess the physical state of a patient’s body.
It includes the following steps:
- Inspection: The first step is to look and see.
- Palpation: Touch and feel.
- Percussion: Use the middle fingers of both hands to elicit resonance sounds) in cavities like the thorax and abdomen.
- Auscultation: Use a stethoscope to detect sounds in the thorax and abdominal cavities. The same is used for detecting bruits, such as, with the brachial pulse when taking blood pressure (BP).
Physical examinations are divided into two main types:
- General physical examination;
- ystemic physical examination.
While this classification is well applicable to adults, there are some modifications when it comes to children. When carrying out a physical examination in a child, ensure that:
- The child is comfortable;
- There is adequate light;
- The examination is carried out gently;
- The child is calm;
- The child is seated on the mother’s lap especially if under 5 years;
- The child is fully exposed;
Common Findings on a Patient with Malaria:
Patients with Malaria present with common findings both in general and systemic physical examinations.
Before you read on do activity 4 below, it should take you 5 minutes to complete.
| 4
Based on your previous experience, what common findings have you made on patients with Malaria during: : a) General physical examination. …………………………………………………………………………………… …………………………………………………………………………………… …………………………………………………………………………………… …………………………………………………………………………………… …………………………………………………………………………………… …………………………………………………………………………………… …………………………………………………………………………………… …………………………………………………………………………………… b) Systemic physical examination. …………………………………………………………………………………… …………………………………………………………………………………… …………………………………………………………………………………… …………………………………………………………………………………… …………………………………………………………………………………… …………………………………………………………………………………… …………………………………………………………………………………… ……………………………………………………………………………………
|
Compare your answers with the following common findings in patients with malaria.
General physical examination:
Check for fever, jaundice, goose skin appearance, pall of varying degrees, loss of skin turgor, dryness of mucous membrane, absence of tears.
- Check the vital signs listed below:
- Temperature
- Blood pressure
- Pulse rate
- Respiratory rate
Systemic physical examination:
- entral nervous system: check if patient is fully alert, drowsy or comatose and for other CNS signs. The last two occur in severe Malaria.
- Respiratory system: look for fast breathing due to fever, occasional difficulty in breathing with basal crepitations due to pulmonary oedema in severe malaria.
- Abdomen check for enlarged spleen which is common.
- Cardiovascular system: this is normal in simple Malaria, however signs of shock in severe complicated malaria may be present.
Always look out for possible presentations of the complications of severe malaria such as: convulsions, severe anaemia, acute renal failure, confusion, Coma, etc
| 5
Bearing in mind what you have just learnt, list down what you would include in the physical examination of Nathan? ………………………………………………………………………………………… ………………………………………………………………………………………… ………………………………………………………………………………………… ………………………………………………………………………………………… ………………………………………………………………………………………… ………………………………………………………………………………………… ………………………………………………………………………………………… …………………………………………………………………………………………
|
I hope your answer included the following steps in Nathan’s physical examination:
- General observation of Nathan as he is brought inside the room and when you were taking his history. Observe what he is doing and whether he is lively, playful, and interested in the surroundings or obviously ill and sick looking;
- Ask the mother to undress him and measure his temperature (if more than 37.5o then he has fever);
- Check for pallor in the inner eyelids, tongue, lips, palms (if pale than these suggest anaemia);
- Check for yellowing of eyes and mucous membranes to confirm or rule out jaundice;
- Look at the eyes – do they look sunken? Ask the mother to comment if they look sunken. Pinch the skin and observe if it goes back fast, slowly, or very slowly; note whether he is thirsty to rule dehydration since Nathan is vomiting;
- Observe for lethargy, coma or altered consciousness;
- Take the pulse of the patient (it is often raised in fever states);
- Palpate the abdomen to check if the spleen is enlarged (the spleen is often palpable in malaria);
- For purposes of completeness look at the patient as a whole including other systems, such as:
- ENT (ear, nose and throat),
- Respiratory system,
- Urogenital tract,
- Central nervous system.
Detailed, general examination is important in establishing the problem and also eliciting any differential diagnosis.
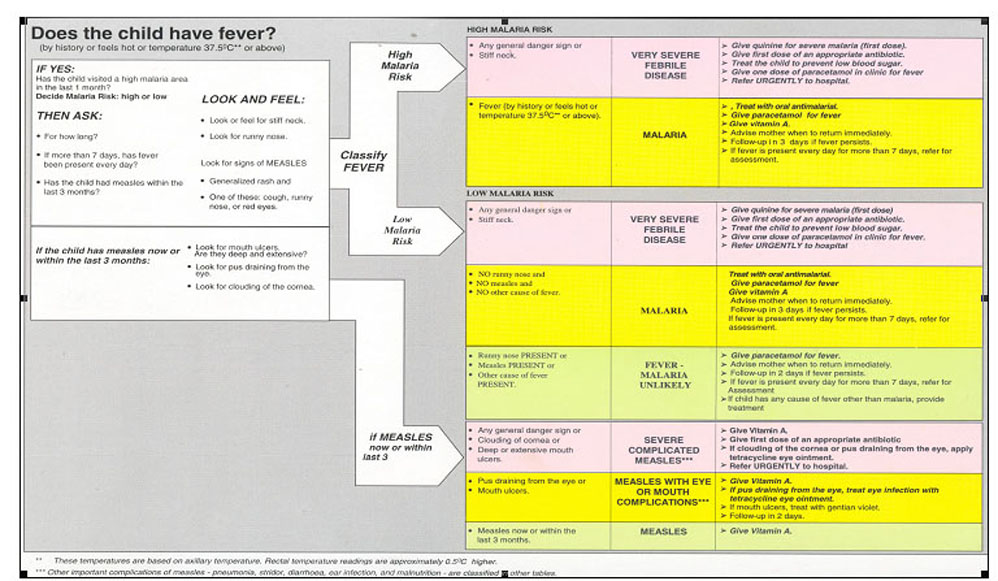
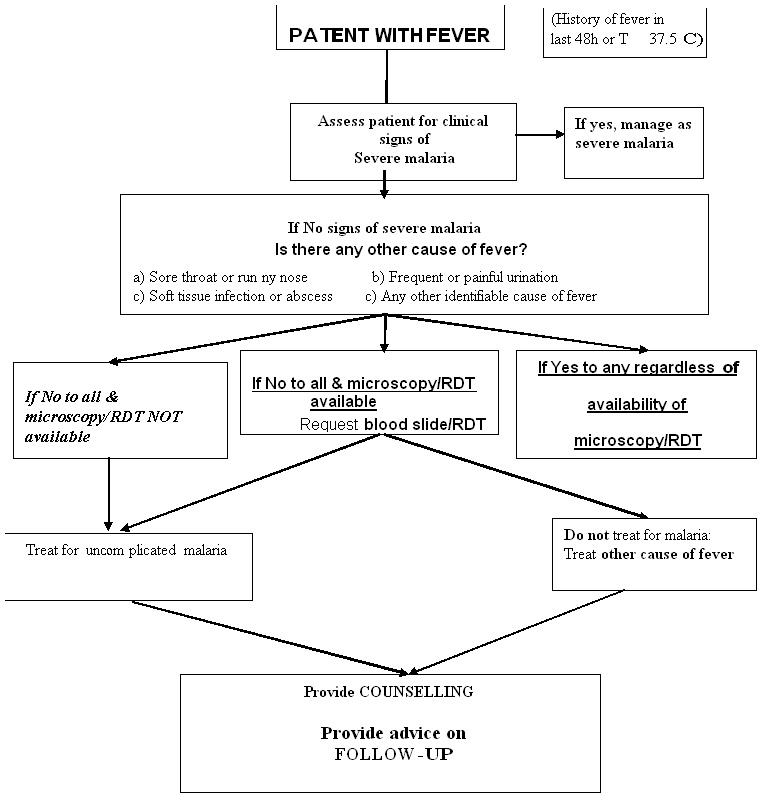
Outpatient algorithms for the management of fevers and uncomplicated malaria are presented in Figure 2 below. The diagnosis of uncomplicated malaria in children under 5 years old should follow the recommended IMCI procedures recommended for a sick child’s initial visit. The diagnosis of uncomplicated malaria in older children and adults should follow the instructions in the algorithm presented in Figure 2.
.
- At the end of the physical examination you must decide what is wrong with the patient. You must also decide on the correct management and follow up. It is important to explain your decision to the patient/guardian. This is also a good time to give Health Education.
Remember the patient or next of kin has a right to know the condition of the illness and the required treatment. The same applies to the guardian or mother of a child who is ill.
Having learnt how to carry out a physical examination, continue with the rest of the course.
.
| 6
|
We had already discussed what you should look out for when examining a patient in the section on common findings in a patient with malaria. Go back to that section and compare your answers with the information given.
Let us now turn to the third step in clinical assessment of a malaria patient, that is, medical laboratory investigations.
Medical Laboratory Investigations and Diagnosis of Malaria
In the case of malaria, taking the patient’s history and conducting a physical examination may not be enough to help you reach a diagnosis. It may be necessary to confirm your findings with some investigations especially where these facilities are present.
Laboratory investigations can range from a simple laboratory procedure to radiological and other complex procedures. Before we dwell further on this topic, do the following activity.
| 7
What do you understand by the term “Investigation” in Medicine? Write down your answer in the space provided below: ……………………………………………………………………………………………………… ……………………………………………………………………………………………………… ……………………………………………………………………………………………………… ……………………………………………………………………………………………………… ……………………………………………………………………………………………………… ……………………………………………………………………………………………………… ………………………………………………………………………………………………………
|
Compare your answer as you read the following discussion.
Medical Laboratory:
A medical laboratory investigation is a procedure done on a specimen in order to confirm or exclude the presence of a disease. In humans, the specimens which are commonly investigated include:
- Blood,
- urine,
- sputum,
- stool,
- pus,
- urethral or vaginal discharge,
- biopsy specimens, etc.
Assuming you have a fully functional laboratory in your health facility, what investigations would you do on a patient who presents to you with signs and symptoms of malaria?
Think and then complete the following activity.
| 8
Write down the investigations you would order for this patient. ……………………………………………………………………………………………………… ……………………………………………………………………………………………………… ……………………………………………………………………………………………………… ……………………………………………………………………………………………………… ……………………………………………………………………………………………………… ……………………………………………………………………………………………………… ………………………………………………………………………………………………………
|
There are a number of investigations that are carried out on patients suspected to have malaria. I hope your answer included some or all of the following investigations:
- Blood slide: There are two types of blood slides:
- hick blood slide (film) – for screening of malaria parasites;
- Thin blood slide film – is for identification of various species of Malaria parasites
- A blood slide helps you to do the following:
- Confirm or exclude malaria;
- Follow up treatment for malaria;
- Screen donated blood for malaria;
- Screen for other haemoparasites;
- Confirm typing anaemia.
- White Blood Cell (WBC) – Total and differential counts may be ordered for:
- P.U.O (Pyrexia of unknown origin)
- Lymphocyte count
- Leukaemia. Remember, these are some of the conditions that present with fever.
- Blood Haemoglobin (Hb) estimation:
- To diagnose anaemia;
- Screening for anaemia;
- To monitor and follow up during treatment for anaemia.Remember, malaria is one of the most common causes of anaemia including severe anaemia.
- Urinalysis: The reasons for carrying out urinalysis are to exclude urinary tract infection as a cause of fever and also for haemoglobinuria as in malaria.
- Blood grouping: This may be ordered before blood transfusion.
Only the most relevant and important investigations, such as a blood slide, should be done in health facilities which do not have enough resources.
As you can see, all the steps you have gone through so far have helped you to confirm or rule out your diagnosis of malaria. In addition to that information, it is also important for you to know the clinical features of malaria in order to be sure that you have made the correct diagnosis. So we shall look at that next.
Parasitological Diagnosis of Malaria
Think and then complete the following activity.
| 9
What are the two methods in use for parasitological diagnosis of malaria and mention their advantages? ……………………………………………………………………………………………………… ……………………………………………………………………………………………………… ……………………………………………………………………………………………………… ……………………………………………………………………………………………………… ……………………………………………………………………………………………………… ……………………………………………………………………………………………………… ………………………………………………………………………………………………………
|
Compare your answers as you read the information below
The two methods in use for parasitological diagnosis are light microscopy and rapid diagnostic tests (RDTs). Light microscopy has the advantage of low cost and high sensitivity and specificity when used by well-trained staff. RDTs for detection of parasite antigen are more expensive, but the prices of some of these products have recently decreased to an extent that makes their deployment cost-effective in some settings. Their sensitivity and specificity are variable, however, and their vulnerability to high temperatures and humidity is an important constraint. Despite these concerns, RDTs make it possible to expand the use of confirmatory diagnosis. Deployment of these tests, as with microscopy, must be accompanied by quality assurance. The results of parasitological diagnosis should be available within a short time (certainly less than 2 h) of the patient presenting. If this is not possible, the patient must be treated on the basis of a clinical diagnosis.
If Parasitological testing is recommended and available, how do you conduct the new rapid diagnostic tests for malaria, also called RDTs? How do they work? How accurate are they? How do you interpret the results?
10
…………………………………………………………………………………………… ……………………………………………………………………………………………………… ……………………………………………………………………………………………………… ……………………………………………………………………………………………………
……………………………………………………………………………………………………… ……………………………………………………………………………………………………… ……………………………………………………………………………………………………… ……………………………………………………………………………………………………
…………………………………………………………………………………………………… ……………………………………………………………………………………………………… ……………………………………………………………………………………………………… ………………………………………………………………………………………………………
……………………………………………………………………………………………………… ……………………………………………………………………………………………………… ……………………………………………………………………………………………………… …………………………………………………………………………………………………
……………………………………………………………………………………………………… ……………………………………………………………………………………………………… ………………………………………………………………………………………………………
……………………………………………………………………………………………………… ……………………………………………………………………………………………………… ………………………………………………………………………………………………………
|
Compare your answers with the notes below.
As we’ve discussed, in many situations, it is important to know whether or not a sick patient has malaria before you give antimalarials. Two methods are used to confirm whether a patient has malaria: microscopy (examination of blood smears under a microscope) and rapid diagnostic tests (RDTs). You may have heard of rapid diagnostic tests for HIV or for malaria. In this unit, we’ll look at what RDTs are and how RDTs make it easier to have parasitologic confirmation of infection. We’ll see how accurate they are compared with blood smears. You’ll also have a chance to actually perform a test during class and read the results.
What are RDTs? Malaria rapid diagnostic tests, or RDTs, detect antigens (proteins) produced by malaria parasites. These antigens are present in the blood of infected or recently infected people. To detect the antigens, RDTs indicate infection by use of immunochromatography (lateral flow of an antigen or antibody [protein produced by a person in response to an antigen] in a filter paper resulting in a colour change. Some RDTs detect only one species of malaria, and some detect one or more species. The tests come in different formats: dipstick, cassette, or card. We’ll look at an example of a cassette test that detects an infection with Plasmodium falciparum.
Why are they being used? They are simple and fast. Now that new treatment policy guidelines recommend parasitological diagnosis of malaria especially for older children (>5 years) and adults in malaria high risk areas and for all age groups in low malaria risk areas, it’s important to have a test that’s easy to use and can give results quickly.
Are they accurate? Yes, RDTs are sensitive in detecting parastaemia. When tests are in good condition, some of them can achieve a sensitivity similar to that commonly achieved by microscopy (looking at blood smears under a microscope).
Can they be used any time a parasitological test is needed; that is, is their use interchangeable with a blood smear? Not entirely. RDTs are NOT recommended for:
- Follow-up of patients who have been treated for malaria since most tests remain positive for up to 2 weeks following effective antimalarial treatment.
- Determination of parasite density. These test are NOT quantitative.
- RDTs cannot be stored for reference. The results are unreliable beyond the manufacturer’s recommended time for reading, e.g., 15-20 minutes, depending on the test.
Do RDTs have special storage requirements? Boxes containing RDTs (prior to use) should be stored in the least humid, coolest place in the facility. The storage site should be clean and as dry as possible. Used RDTs should be disposed of after the results have been interpreted and recorded; since the results shown on the test cassette are unreliable beyond the recommended time for reading.
| 11
1. List the materials contained in the test kit ……………………………………………………………………………………………… ……………………………………………………………………………………………… ……………………………………………………………………………………………… ………………………………………………………………………………………………… ………………………………………………………………………………………………… ………………………………………………………………………………………………… ……………………………………………………………………………………………… ……………………………………………………………………………………………… 2. List other materials needed ……………………………………………………………………………………………… ……………………………………………………………………………………………… ……………………………………………………………………………………………… ……………………………………………………………………………………………… ……………………………………………………………………………………………… ………………………………………………………………………………………………
|
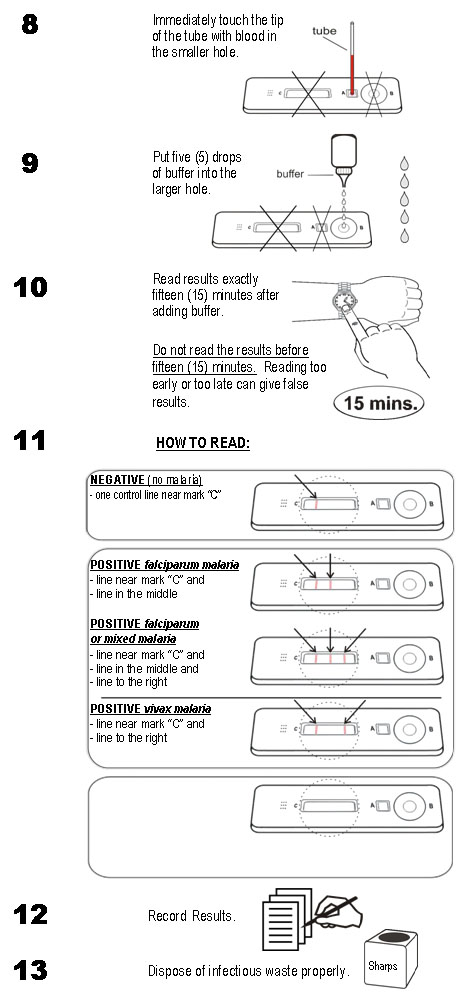
How does an RDT work? The test cassette contains a strip with antibodies against malaria parasite. When blood is added, it flows along the strip. If malaria parasite antigens are present, two bands are formed: a control band and a positive test band. In the absence of malaria parasite antigens, only the control band is formed.
What materials are needed? The test kit may contain some of the following materials:
- Instruction sheet (package insert)
- Packaged cassettes
- Blood collection devices (micropipettes or micro-capillary tubes)
- Reagent buffer
- Swabs (70% alcohol, cotton wool or gauze)
- Lancets
- The items may or may not be included in a box containing many test kits. Lancets and swabs are optional, and buffer is often one bottle for 25 tests.
Make sure to protect yourself and others.
|
Other materials will be needed:
- Gloves
- Timer (watch or clock)
- Sharps disposal container
- Pencil or fine marker pen
- Laboratory register
- Extra gauze or cotton wool
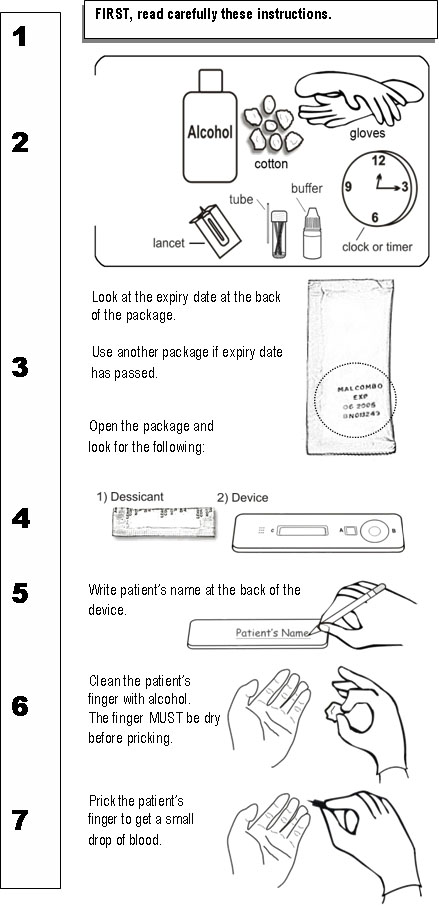
Instructions for Performing the Test
RAPID DIAGNOSTIC TESTS (RDTs)
Introduction:
- The implementation of the new drug policy of ACTs requires that all suspected cases of malaria be confirmed. In view of limited laboratory services in the rural health facilities, use of RDTs would be necessary to compliment the use of microscopy.
Principle / Purpose: RDTs are used for the identification or exposure to malaria parasites by the detection of antibodies, parasite antigens, parasitic metabolic products or parasite enzymes. They usually use immune-chromatographic methods performed on lysed blood containing antigens / antibodies and other parasites metabolic products.
Materials and apparatus Materials used with the test kit
- Instruction sheet (package insert)
- Packaged cassettes
- Lancets
- Blood collection devices (micropipettes or micro-capillary tubes)
- Reagent buffer
- Swabs (70% alcohol, cotton wool or gauze)
- Gloves
- Timer (watch or clock)
- Sharps disposal container
- Pencil or fine marker pen
- Laboratory register
- Extra gauze or cotton wool
Procedure
.
.
RDT’s Do’s and Don’t’s
| DO open the package immediately prior to performing the test.
DO collect only enough blood on the blood collection device as specified in instructions – too much blood will obscure the bands/lines on the test strip. DO dispose of test cassette after recording results. Cassettes should be disposed of with hazardous waste. DON’T leave the test exposed to air for long period before using -- humidity and heat may lead to incorrect results when using. DON’T store RDTs for reference. DON’T store and THEN look for result. Results become invalid (they tend to turn positive with exposure to air and a humid environment). DON’T reuse cassettes. DON’T freeze. DON’T mix reagents/buffer from different kit lots. |
COLLECTION OF BLOOD SAMPLES FOR PREPARATION OF THICK AND THIN BLOOD SMEARS
Introduction
Malaria diagnosis can be done from capillary or venous blood.
- Venous blood: Blood specimen obtained from a vein.
- Capillary blood: Blood sample obtained from a puncture of the side ball of finger or puncture of the big toe or the heel of neonates.
Principle
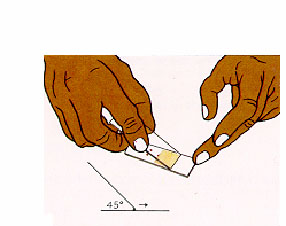
Venous/Capillary blood is used for detection of malaria parasites. A thick blood smear is a drop of fresh blood spread in a circle (15mm diameter) on a microscope slide and allowed to air dry. It concentrates the parasites. A thin blood smear is a drop of blood spread evenly on a microscope slide so that the red cells are on a single plane (do not overlap). This allows examination of individual blood cells and species identification.
Method
(i)Capillary Blood
- Ensure that the patient is comfortable and explain the procedure.
- Make sure you wear gloves before starting the procedure.
- Cleanse the puncture area with swab soaked in 70% ethanol or methylated spirit.
- Allow the area to dry
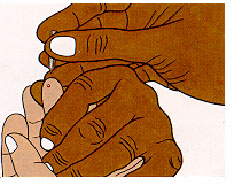
- Using a sterile lancet, make a puncture sufficiently deep to allow the free flow of blood.
- Avoid squeezing the finger too hard as this will lead to haemodilution from tissue fluid giving an unreliable test result.
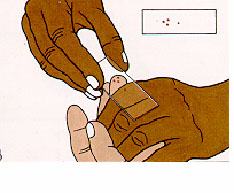
- Wipe off the first drop of blood with a dry piece of cotton wool and use the next few drops for the test
- Transfer the capillary blood directly onto clean glass slides or into a capillary tube or pipette.
- Place a piece of dry cotton wool at the puncture site to stop the bleeding.
- Immediately place the materials used for wrapping the lancet and the cotton wool in the bucket marked “INCINERATION”. Place the used lancet in the container marked “SHARPS”
(ii) Venous blood
- Ensure that the patient is comfortable.
- Make sure you wear gloves before starting the procedure.
Carefully label the sample container(s) before collecting blood. (Patient lab no.; Date of collection)
- Use a sterile syringe of the capacity required e.g. 2.5ml, 5 ml or 10 ml.
- Fix a 19, 21 or 23G needle to the syringe as appropriate.
- Apply a tourniquet to the upper arm of the patient to enable the veins to be seen and/or felt.
- Ask the patient to make a tight fist, this will make the veins more prominent.
- Using the index finger, feel for a suitable vein, selecting a sufficiently large vein that does not roll or collapse.
:For children, infants, obese and dehydrated patients, blood can be collected from the veins at the back of the hand.
- Clean the puncture site with cotton wool soaked in 70% ethanol or methylated spirit and allows to dry. Do not retouch the cleansed area.
Make sure the site is warm to ensure the blood flows freely. On cold days soak the hand (or foot of an infant) in warm water prior to collecting the sample.
- With the thumb of the left hand holding down the skin below the puncture site.
- Insert the needle along the line of the vein with the bevel of the needle facing directly upwards.
- Steadily withdraw the plunger of the syringe once you notice blood at the tip of the syringe.
- Release the tourniquet and instruct the patient to open his/her fist.
- Where available, the vacutainer system should be used
- When sufficient blood has been withdrawn:
- Remove the needle and press firmly on the venepuncture site with a piece of dry cotton wool.
- Remove the tourniquet and instruct the patient to continue pressing on the puncture site until the bleeding stops.
- Remove the needle from the syringe and carefully fill the tube(s)/bottles with the required volume of blood and immediately mix blood in containers with anticoagulant.
- Place the needle in the container marked “SHARPS”. Place the syringe, cotton wool and materials used for wrapping the needle and syringe in the bucket marked “INCINERATION”.
- Check that the bleeding from the venipuncture site has stopped. Cover the area with a small dressing, if necessary
NOTES:
- Hold the glass slide by the edge to avoid contaminating the surface of the slide.
- A venous blood sample can be used for other laboratory tests
Precautions
- If an adequate sample is not available in the first try, do not repeat on the same puncture site. Try the other hand/arm or call for assistance from a colleague.
- Observe bio-safety measures
- Do not attempt to re-sheath the needle using both hands because this can cause a needle stick injury/accidental prick.
- Do not fill the blood containers with the needle still attached to the syringe, as forcing the blood through the needle may cause haemolysis.
The Clinical Features of Malaria
Just like in other diseases, the diagnosis of malaria is made based on the presence of certain signs and symptoms. As you may have realized, the signs and symptoms of malaria are non-specific and can mimic those of many other infections. Table 2 below gives a list of the signs and symptoms. That is why it is important to supplement your clinical diagnosis with careful history, proper examination and a laboratory diagnosis to determine malaria parasites in the blood smear.
Table 2: Signs and symptoms of malaria
| Symptoms | Signs |
|---|---|
Fever and chills
|
*High temperature, rigors
|
As we mentioned earlier, the peak of primary fever in malaria coincides with the release of successive broods of merozoites from the rupture of infected Red Blood Cells (RBCs).
Periodic fever is usually a symptom of only the less dangerous forms of malaria which are caused by P. ovale, P. malariae and P. vivax. In P falciparam malaria there is less fever periodicity because the erythrocytic stage of the parasites are frequently not synchronished.
A typical attack of fever has three stages: cold, hot and sweating:
(i)The cold stage: The temperature rises and the patient shivers for 1-2 hours. It is during this stage that the infected red cells burst, releasing merozoites, and many ring forms are seen in the blood smear.
(ii)The hot stage: This one lasts for 3-4 hours. The patient has a high temperature of about 400 C and severe headache, often with nausea and vomiting. The skin is also dry and hot.
(iii)The Sweating stage: The temperature falls rapidly and the patient sweats profusely to extend of the beddings or clothes getting soaked. It lasts for 2-4 hours and the patient feels relieved but exhausted.
Conclusion
You have now come to the end of Unit 2. In this unit, we described the steps you should follow when carrying out a clinical assessment of a malaria patient. These were history taking, physical examination and laboratory diagnosis. We also discussed the common findings in malaria and the clinical presentation of a patient with malaria.
You should now review the learning objectives at the beginning of this unit to check if you have achieved all of them. If you are not sure of any go back to the relevant section and read it again. If you feel you have achieved all of them proceed to do the attached assignment and send to your tutor for marking.
In the next unit we shall discuss how to diagnose and manage severe and complicated malaria.
|
Student Name __________________________________ Student Number:__________________________________ Student Postal Address: __________________________ __________________________
1. Outline the ten components of a patient’s history:
2. List down the four main steps of carrying out a physical examination.
3. An adult female aged 20 years comes to you complaining of fever, headache, chills, loss of appetite and joint pains. She has no diarrhoea or vomiting, she has no cough, no convulsions, no ear discharge, no pains in throat and passes urine well. She has not taken any medication since the onset of her illness. (i) What additional questions would you ask her about her illness? ……………………………………………………………………………………………………………………………………………………………………………………………………………………………………………………………… ……………………………………………………………………………………………………………………………………………………………………………………………………………………………………………………………… ……………………………………………………………………………………………………………………………………………………………………………………………………………………………………………………………… ……………………………………………………………………………………………………………………………………………………………………………………………………………………………………………………………… ………………………………………………….
……………………………………………………………………………………………………………………………………………………………………………………………………………………………………………………………… ……………………………………………………………………………………………………………………………………………………………………………………………………………………………………………………………… ……………………………………………………………………………………………………………………………………………………………………………………………………………………………………………………………… ………………………………………………….
……………………………………………………………………………………………………………………………………………………………………………………………………………………………………………………………… ……………………………………………………………………………………………………………………………………………………………………………………………………………………………………………………………… ……………………………………………………………………………………………………………………………………………………………………………………………………………………………………………………………… ………………………………………………….
……………………………………………………………………………………………………………………………………………………………………………………………………………………………………………………………… ……………………………………………………………………………………………………………………………………………………………………………………………………………………………………………………………… ……………………………………………………………………………………………………………………………………………………………………………………………………………………………………………………………… ………………………………………………….
……………………………………………………………………………………………………………………………………………………………………………………………………………………………………………………………… ……………………………………………………………………………………………………………………………………………………………………………………………………………………………………………………………… ……………………………………………………………………………………………………………………………………………………………………………………………………………………………………………………………… …………………………………………………. Congratulations! You have now come to the end of this assignment. Send it to AMREF or bring it in person. We shall mark it and return it to you with our comments. Remember to indicate your name and student number before you post the assignment. |
