Crystal Creations
| Instant wiki maker | Making handouts | Editing tips |

Biology In Elementary Schools is a Saint Michael's College student project from a course that ran between 2007 and 2010. The student-created resources have been preserved here for posterity. Link under 'toolbox' for printer-friendly versions of the exercises. Click on handouts to print full resolution versions. Please see Wikieducator's disclaimer, our safety statement, and the Creative Commons licensing in English and in legalese.
Primary Biological Content Area Covered
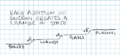
Crystals: growth process
Materials
- Mrs. Stewart's Liquid Bluing
- Plastic cups (medium size)
- Rocks (small in size, one for each student)
- Safety goggles
- Droppers (transfer pipets)
- Food coloring
- Water
- Table salt
- Latex-free gloves
- Smocks
| Bluing (fabric) | |
| Wikipedia has an article on this subject.
Visit Bluing (fabric) for more in depth information |
Safety
While Mrs. Stewart's Bluing is a substitue to amonia, it is potentiall dangerous if swallowed and could possibly harm clothing. Wear safety goggles and latex free gloves when touching the bluing liquid
Handouts
If there are simple written instructions that students would use during this activity they should be placed here and they can be cut and pasted into a word processing document for printing. If there are mechanisms within this web format to upload more complex documents with diagrams, we will learn as we go.
Description of Activity
Day One:
- Pour two tablespoons of water over the base which, in our case is a rock however a sponge will also work as well.
- Pour two tablespoons of salt over the base.
- Pour two tablespoons of Mrs. Stewart's Bluing liquid over the base.
- The bluing liquid will stain your clothes and hands so make sure to use the smock
Day Two:
- Add two more tablespoons of salt to the base.
Day Three:
- Add two more tablespoons each of water, salt and bluing to the cup BUT NOT THE BASE.
At this point the crystals should be growing well. If you run into problems, make sure that the cup is in a well circulated and dry place in order to promote crystal growth. If you want the crystal to grow more, from time to time add more bluing, water and salt.
http://www.mrsstewart.com/pages/scginstructions.htm
Lesson Plan
Because three of us were teaching this lesson, it worked out well to split up the work.
- We split the group into pairs or groups of three and then we put their names on their cup that they were going to use.
- We gave each student a pair of gloves and some safety goggles to use during the experiment.
- I started by explaining to students the difference between liquid, solid and a gas. I had pictures of the molecular buildup (gas being all over the place, liquid being stacked with some space, and a solid being tightly stacked on top of each other.
- The other thing that I explained to them was one substance (I used the example of a pot of water) could change into a liquid, solid and a gas but, regardless, the substance itself hasn’t changed, simply the form it has taken.
- If you boiled a pot of water on the stove, you would see steam and condensation (gas), however, if you stopped boiling the water, then the water would go back to just being a liquid. However, if you were to stick the pot of water in the freezer, then it would freeze (solid).
- Next we helped each student to put the two tablespoons of water, bluing and salt in the cup with the rock. Once they were done with this, we let them explore.
- We had microscopes for them to look at our pre-made rocks, as well as a book which showed them different things that have crystals (or crystal components) in them, what their birth stone was, and other cool things that they were interested in.
- We also discussed the different ways to classify crystals.
States of matter
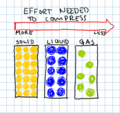
Effort needed to compress states of matter


Potential Pitfalls
This experiment needs to take place over three days because the salt absorbs the liquid bluing (as it’s supposed to) so, it’s important on day two and three to add more bluing. The potential problem may arise because day one is a Friday and so adding more bluing on day two and three would be a Saturday and a Sunday.
The first time that we did a test run of this experiment we had the time to follow the instructions as follows and add more bluing and salt on day two and three however.
When we implement this experiment in the classroom we will be doing it on a Friday so adding more bluing and salt will be slightly difficult. For this reason we tried modifying the experiment slightly. We put one rock in our cup and added two tablespoons of bluing, water and salt. We are going to leave it over a two day period and see if the crystals still grow. If this modified experiment does work and produce crystal growth then we will have them to the experiment and leave it over the weekend. If crystal growth does not form, then we will have to figure out what we can do to modify the experiment so that students will be give the opportunity to successfully grow the crystals.
Math Connections
Students will be measuring contents of water, salt, and Mrs. Stewart's Liquid Bluing with the use of a tablespoon and a dropper (transfer pipets).
Literature Connections
"The Magic School Bus Explores Inside the Earth" by Joanna Cole and Bruce Degen
"Crystal & Gem (DK Eyewitness Books)" by R.F. Symes and R.R. Harding
Connections to Educational Standards
7.1: Scientific Method - Students use scientific methods to describe, investigate, explain phenomena, and raise questions.
7.2: Investigation - Students design and conduct a variety of their own investigations and projects.
Reflection
This project was far more successful that I had anticipated it would be. The age of the students played a huge factor in this. Most of the other students we worked with were in 1st or 2nd grade and, while this did not inhibit our teaching, it did slow us down a bit in some regards. Groups who had worksheets that involved people writing hypothesizes or other phrases struggled with students who weren’t the most confident spellers. There were also many concepts that seemed to be lost on the younger students.
This was not the case with the students from today; they were 3rd and 4th graders and they either already had the knowledge for concepts such as evaporation, states of matter, condensation, compositions of atoms or, if it new concept, they were able to grasp it quickly. It was also far easier to keep their attention drawn for the entire 25-30 minute session we had with them.
At first I was nervous that we weren’t going to have enough planned to fill each session. Partly due to only having two measuring spoons, each group was share the spoon which slowed us down (not a bad thing at all). With the rest of our time, we found that the entire group naturally split into two groups as the other two students began talking about more applications of crystals. There was a book that we discovered they had in their classroom about crystals and gems which was very helpful. The students explored the book finding out what their birth stone was, different places that crystals are found (LCD screen’s, bones, etc.) and the other groups talked about the different kinds of crystals, where you could find them, how long it took them to form, and how hard (or soft) they were.
All in all, this lesson was highly successful and if I were doing this by myself, I would make sure to have the answers to all the picky questions they might have had (exactly how long does it take for crystals to form, what composition of crystals are found in your bones, exactly why does the bluing help to create crystals, and so on). Very exciting to do a project which was a success, the students were excited to be a part of as well and which was fun for us to teach as well!!!
I was very pleased with how this lesson turned out. At the beginning I was nervous because I didn’t think that there was going to be enough material to last us the full 30 minutes. However, the students were so engaged with what we were doing that even though the actual hands-on part of the lesson was done we still had their full attention. They asked us countless questions about crystals from how they are made to how much you could sell them for. I believe this lesson, though could be tweaked a bit, is a solid lesson that could work for grades 3-5.
We didn't end up using smocks for our project but we did it with 5th graders and they were fairly careful. That said, if you do this experiment with younger kids, it would make sense to use smocks because the bluing will stain your clothes and hands.
First of all, I thought it was a pleasure working with the 3rd and 4th grade students. I thoroughly enjoyed the change of style and pace, since we were used to teaching 1st and 2nd graders in our previous science experiments. Performing an experiment such as Crystal Creations, with just even a couple grades higher, proved to be very effective and worked to our advantage. They were either already knowledgeable of the concepts we were explaining (Example: Chemical and physical properties, states of matter, evaporation, condensation, etc.) and with their hand raised high, willing to participate and answer, or easily grasped what we were teaching (Example: What are crystals made of? How are they classified?). It seemed that filling the time interval of 25 minutes was far simpler working with the older students for this particular project. I was a bit concerned initially, because the last couple experiments we performed, we had to think of other things to do/talk about to maintain the interest and focus of the students, however, it was almost effortless trying to keep their attention, because they were incredibly engaged. Each individual student was enthusiastic in one way or another, which was great!
As for the experiment itself, the students gave the impression that it not only created a science environment, but one of fun as well. They also got to work collaboratively with another classmate—measuring, pouring, hypothesizing. Along with the project, we had a colorful poster that served as a visual aid, and pre-made crystals for the students to get a hands-on experience of what crystals look and feel like, and an idea of what theirs would look like when fully grown. To our luck, there was also a children’s book about crystals and gems right in the classroom!
I believe the only drawback we encountered was that this was a 2-3 day experiment, and the process takes up to a week. But nonetheless, we designed it to the best of our ability, and it turned out successful.
Citations and links
While brand new ideas are very valuable and most welcome here, tried and trusted ideas of others will probably make up the bulk of the material on this site. It is important to respect the copyrights of others, and also to acknowledge their ideas. A full citation to published materials is essential and also useful. If there are online materials that would be useful to supplement your program, link to them from here.