Cool Camo
| Instant wiki maker | Making handouts | Editing tips |

Biology In Elementary Schools is a Saint Michael's College student project from a course that ran between 2007 and 2010. The student-created resources have been preserved here for posterity. Link under 'toolbox' for printer-friendly versions of the exercises. Click on handouts to print full resolution versions. Please see Wikieducator's disclaimer, our safety statement, and the Creative Commons licensing in English and in legalese.
Student worthiness
Our activity was tried and extremely successful. The students enjoyed camouflaging their paper bugs and then going on a hunt to find them!
Primary biological content area covered
Students will learn how some animals disguise or camouflage themselves as a form of protection. They will also learn the 4 different types of camouflage from the handout at the culmination of the activity.
Materials
Materials for Individual Students
- White print outs of animals/bugs
Materials for Student Group
- Markers/Colored Pencils
- Scissors
- Tape
Materials for Teachers
- Construction paper
- Different examples of camouflage
- polar bear, blue ringed octopus, king snake, Phasmatodea (walking stick bug)
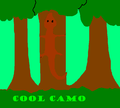
Figure 1:Example of Camouflage
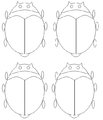
Figure 2:Beetle Cutout for students to camouflage
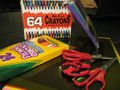
Figure 3: Student Materials


Handouts
Student Handout of different animal camouflage techniques.
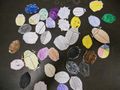
Figure 4: All of the bugs after students camouflaged and found them.

Figure 5: Student camouflaged bug.

Figure 6: Other student camouflaged bug.
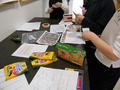
Figure 7:Students working on bugs.


Description of activity
We will begin the lesson by discussing the camouflage technique that animals use and why. We will explain to the students that camouflage is necessary for certain animals to survive! We will ask students if they know of any animals that use camouflage. We will go over, with the students, a handout that describes the four different camouflage techniques; while learning the different techniques we will hold up pictures of animals that use each one. For example, when teaching students about the blending technique we will hold up a picture of a polar bear whose white fur blends with the snowy environment they inhabit. We’ll tell students that they get to camouflage their own animals now! We will give them paper cutouts of a beetle and tell them to pick a place in the room where they want to hide their animal. We will explain to the students that they must color their animal so it looks like the color and pattern of the location they choose. We will have students separate and sit in different parts of the room so their animal designs can be kept secret. Once all of the animals are hidden, we will have students search silently for the animals (for about 5 minutes) to see how many they can find. After the activity we will re-group to have a discussion about the various camouflaging techniques used.
Lesson plan
Topic of the Lesson/Subject: Animal Camouflage Techniques Grade/Course: 3rd Grade Science Time: 2 hours, 20 minutes each with 6 groups
DESIRED RESULTS:
Lesson Essential Question:
What is camouflage? Why do animals camouflage themselves? What are the different types of camouflage?
Vermont Standards and/or GEs:
S3-4:30 Students demonstrate their understanding of Structure and Function-Survival Requirements by explaining how the physical structure/characteristic of an organism allows it to survive and defend itself
Learning Objectives:
Students should demonstrate an understanding of animal camouflage techniques-why they are used and what they are.
Focusing Questions:
Why do animals camouflage themselves?
What different ways can they camouflage themselves?
What types of animals camouflage themselves?
ASSESSMENT EVIDENCE:
Criteria:
Students will be assessed on their understanding of the meaning of camouflage and the different manners of camouflage. They will also be assessed based on their ability to camouflage their own animal cutouts according to the location they choose.
Product or Performance Task:
Students will be assessed on their understanding of the different types of camouflage by camouflaging their animal cutouts to fit their chosen location.
EX. If a student chooses to camouflage their bug on a wooden door, they would match the bug to the color and pattern of the door thus displaying the blending and pattern techniques of camouflage learned in the lesson.
LEARNING PLAN:
Expectations:
Students should demonstrate an understanding of the meaning of camouflage, the reasons for camouflage, and the four different types of camouflage.
Accommodations:
Accommodations will be made for any and all students in order to reach all students educational needs.
Procedure:
Introduction:
This lesson will begin with asking students the questions, "Do you know what camouflage means? Do you know what animals might camouflage themselves?" We will discuss the reasons for camouflage and go over the student handout to explain the different camouflage techniques and examples animals use them.
Instruction:
Students will be given paper cutouts of beetles and we will instruct them to pick a place in the room where they want to hide their animal. We will explain to them that they must color their animal the color and pattern of the location they choose. We will have students separate and sit in different parts of the room so their animal design can be kept secret. We will then have students tape their bug to their chosen location. After students have completed their task, we will have them search silently for 5 minutes to see how many bugs they can find. After the allotted 5 minutes we will re-group and sit in a circle. We will ask students how many of them were able to identify all of the bugs and have a discussion about the camouflaging techniques their classmates used to hide their bugs.
Closure and Connections:
Students will gain the ability to identify the camouflaging techniques their classmates used to disguise their bugs and why.
Art connections
A1-2:10 Students show skill development when CREATING art by… · Using line in various media (e.g., pencil, marker, cut-outs, etc.) to create shape and image. · Handling and naming of art tools and materials. · Using elements of 2D and 3D design (e.g., 2D—mixing primaries to create secondary colors; 3D—forming a 3D object with texture).
A1-2:19 Students approach artistic problem solving with an open mind and creative thinking by… · Responding to teacher suggested solutions (e.g., Keep a steady beat; Try mixing yellow and blue.).
Literature connections
As an alternative to showing students single images and explaining the different types of camouflage, one could read 3-D Close Up: Animal Camouflage by Daniel Gilpin which includes pop up pictures of animals who camouflage themselves. By reading this book, students will learn why some animals need to hide and how they do it.
Potential pitfalls
Almost everything ran smoothly, however, one child began to cry because he felt that he did not have enough time to hide his bug, and as a result, his was found first by his classmates. To reduce this problem in the future, it is important to give the students a set time limit and remind them frequently how much time is left.
Connections to educational standards
S3-4:30 Students demonstrate their understanding of Structure and Function-Survival Requirements by…
- Explaining how the physical structure/characteristic of an organism allows it to survive and defend itself
Next steps
Now that the students have explored and learned about the different types of camouflage, a good next step would be to look at the different types of camouflage in more detail. In small groups students could identify the type of camouflage they used when making their bug, and report out to the class with their findings. This activity is a good introduction for students to learn about how different animals successfully survive in their environment, and which strategies are suitable for different animals. Perhaps student could find pictures of different animals and group them together based on their unique camouflage technique.
Reflections
Overall the Cool Camo was a very successful and fun lesson! Students seemed to be excited about the activity as well as learning about the different types of camouflage. We began each group by talking about the four different types of camouflage; each one of us talked about a different type of camouflage giving each of us a chance to lead the lesson. We also showed the students pictures of an animal using one of the types of camouflage, providing examples for the students.
After this introduction each student was given the bug cut out for them to color and camouflage. With each group of students we, as a group, got better at giving helpful hints and directions to students such as reminding them to pick a place to hide their bug before coloring. This helped students think more carefully, and in some cases more creatively about where the students hid the bugs.
This lesson was over all a huge success and students seemed to enjoy every aspect of the lesson, especially the “Bug Hunt” at the end. After all the students hid their bugs the group as a whole would look to spot the camouflaged bugs. Having a larger space would have been really beneficial to the lesson as it would have given us more space to hid bugs, also a room with more visuals would have been great for this lesson. A regular school classroom would have been excellent for this lesson.
Also throughout each lesson our group became more and more confident and comfortable. We, as teachers, also made our own example of camouflaged bugs and hid them in the hallways; the students enjoyed finding our bugs in the hallways as well as their own. And with each group our introduction to the lesson became stronger and more specific as we talked about the four different types of camouflage.
Citations and links
The original idea was taken from a Utah education website and modified to fit our objectives.
The worksheet ideas were taken from the Scholastic teaching website.
The beetle cutouts were re-drawn from a communication disorder website.
Gilpin, Daniel. 3-D Close Up: Animal Camouflage. Silver Dolphin Books, 2010. Print.