A Fiery Energy Flow
| Instant wiki maker | Making handouts | Editing tips |
Contents
- 1 Primary biological content area covered
- 2 Materials
- 3 Handouts
- 4 Description of activity
- 5 Lesson plan
- 6 Potential pitfalls
- 7 Carbon Dioxide and Photosynthesis: Elements of Chemistry
- 8 Literature connections
- 9 Art in Science
- 10 Multiple Intelligences
- 11 Necessary Vocabulary
- 12 Connections to educational standards
- 13 Next steps
- 14 Reflections
- 15 Citations and links
Biology In Elementary Schools is a Saint Michael's College student project from a course that ran between 2007 and 2010. The student-created resources have been preserved here for posterity. Link under 'toolbox' for printer-friendly versions of the exercises. Click on handouts to print full resolution versions. Please see Wikieducator's disclaimer, our safety statement, and the Creative Commons licensing in English and in legalese.
Primary biological content area covered
- Energy flow through in the ecosystem.
- The process of photosynthesis. To make the link between sunlight energy driving chemical reactions that convert CO2 into carbon compounds with an O2 waste product.
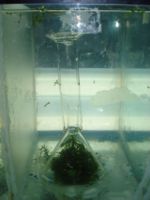
1a. Photograph shows aquarium full of water with Elodea plants placed under a glass funnel with a test tube placed on top of it. Sodium Bicarbonate has been added and it has been placed under direct light source to produce oxygen.
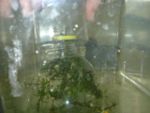
1b. Photograph shows household model using an aquarium full of water and Elodea Plants placed under the top of a two-liter bottle. There is a baby food jar placed ontop of the two-liter bottle cap opening, placed under a direct light source, and sodium bicarbonate has been added to the water to produce oxygen.
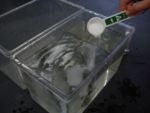
2a. Photograph shows Emily adding a tablespoon of sodium bicarbonate to the water in the aquarium to assist the Elodea plants in producing starches and released oxygen.
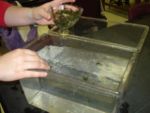
2b. Photograph shows Emily nesteling Elodea plants in the center of the two-liter bottle opening prior to placing it in the aquarium.
Materials
Teacher's Materials: For Experiment
- Aquariums
- Water Weed/Elodea Plants (found in pet stores)
- Funnels
- Test Tube
- Water Conditioner (Proline Water Conditioner)(1 tspn per 30 gallons to clean the water of any additants which may change the result of the experiment)
- Sodium Bicarbonate (Baking Soda, 8 tbsp for 30 gallons)
Household Materials: Alternative Options For Experiment
- Cut off the top half of a plastic two liter bottle and remove the cap, you now have a funnel
- Baby food jars can work as test tubes to be placed ontop of the two liter bottle opening
- Index card to enclose the gas in the baby food jar .
For Model Photograph Refer to 1b.
Teacher's Materials: For Diagram
- Construction paper cut-outs of Suns, Plants, Humans, Water Sources and Oxygen.
- Handout (printed from below).
- Glue Sticks.
Handouts
Description of activity
This activity is designed to visually express energy flow and photosynthesis in an ecosystem. In this activity students will put water plants into an aquarium and place it under a light source. Oxygen bubbles will build up in a test tube. After enough oxygen bubbles have built up remove the tube and place a match into the tube that has been freshly blown out. The match should reignite providing an exciting demonstration of how the sunlight transferred energy to the plant, which in turn produced the oxygen that reignited the match.
Lesson plan
[1] Introduction to Topic: Photosynthesis and Energy Flow
- Introduce vocabulary.
- Explain to the students what they are going to be doing.
[2] Build the model:
- Have students help you build the model.
Refer to photograph 1a.
- Steps for Building Your Model:
- Take an aquarium large enough to fit a funnel and fill it almost to the top with water. Add a few tablespoons of sodium bicarbonate to create a more rapid production of oxygen in the aquarium (We added 8 tablespoons for 30 gallons).
Science Hint! Purpose of Sodium Bicarbonate: Sodium Bicarbonate is added to the aquarium to mimic the carbon dioxide that would naturally be in the environment to help the plant construct the startches that make its food.Refer to Photograph2a
- Place the water plants inside the aquarium. Nestle them close together in the center and cover them with a clear funnel. Place the funnel over the plants so that the small tubular part is pointing upwards.Refer to Photograph 2b
- Place a test tube in the water, making sure that it fills with water completely.
- Keeping the test tube under the surface, turn the test tube over onto the stem of the funnel, make sure no water escapes from your funnel –There should be NO air bubbles in your test tube.
- Place the aquarium under a light source for a few days (the aquarium needs to be under direct light constantly or the results of the experiment may change.)
Purpose: Allowing the students to help in the building process lets the students see first hand the important elements of the experiment and allows them to talk about and make predictions - an important step in the scientific method.
[3] Making Predictions:
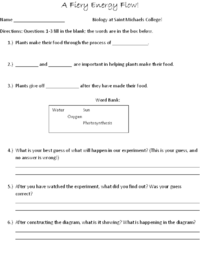
- Assess the students' prior knowledge and create predictions. Give students the handout and review the questions on the sheet and then ask them to make their predictions on the handout from what they learned by building the model.
Purpose: To assess the student's prior knowledge of photosynthesis and allow them to analyze the model to construct a prediction prior to the demonstration. [5] Creating a Diagram:
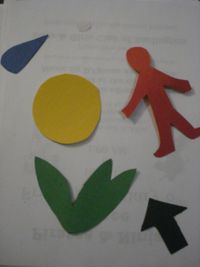
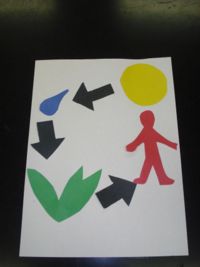
- Have students create pictures of the sun, plant, oxygen bubbles, water, human and four arrows. These can be made from construction paper. Have the students paste their pictures on a sheet of paper, this is showing the flow of energy from all of the components of photosynthesis.
Purpose: To assess the lesson and apply it on a larger scale than the class-room experiment. Students become involved and use their artistic talents to create. They also leave the lesson with a visual aid for understanding energy flow and the process of photosynthesis. [6] Lesson Wrap-up: Time for any last comments, questions, extra time to work on diagrams, and clean up time. We would also read the book Trout are Made of Trees by April Pulley Sayre (Author) and Kate Endle (Illustrator)and Photosynthesis: Changing Sunlight into Food (Nature's Changes)by Bobby Kalman, to culminate this lesson. We will then discuss with the students the next steps.
Potential pitfalls
- Oxygen may not be produced as rapidly as needed for demonstration.
- You may need to leave your model overnight (or for several days). If you want to complete the experiment in one lesson have another aquarium ready that you had set up the day before.
- Match may not re-light due to loss of gas in the test tube.
- Have multiple models set-up so that if one doesn't work, you can try again.
- Not enough oxygen built up in the test tube.
- Add more sodium bicarbonate as necessary.
Carbon Dioxide and Photosynthesis: Elements of Chemistry
Carbon dioxide is an end product in organisms that obtain energy from breaking down sugars, fats and amino acids with oxygen as part of their metabolism, in a process known as cellular respiration. This includes all plants, animals, many fungi and some bacteria. In higher animals, the carbon dioxide travels in the blood from the body's tissues to the lungs where it is exhaled. In plants using photosynthesis, carbon dioxide is absorbed from the atmosphere.
Role in photosynthesis Plants remove carbon dioxide from the atmosphere by photosynthesis, also called carbon assimilation, which uses light energy to produce organic plant materials (cellulose) by combining carbon dioxide and water. Free oxygen is released as gas from the decomposition of water molecules, while the hydrogen is split into its protons and electrons and used to generate chemical energy via photophosphorylation. This energy is required for the fixation of carbon dioxide in the Calvin cycle to form sugars. These sugars can then be used for growth within the plant through respiration.
Even when vented, carbon dioxide must be introduced into greenhouses to maintain plant growth, as the concentration of carbon dioxide can fall during daylight hours to as low as 200 ppm. Plants can potentially grow up to 50 percent faster in concentrations of 1,000 ppm CO2 when compared with ambient conditions.[30]
Plants also emit CO2 during respiration, so it is only during growth stages that plants are net absorbers. For example a growing forest will absorb many tons of CO2 each year, however a mature forest will produce as much CO2 from respiration and decomposition of dead specimens (e.g. fallen branches) as used in biosynthesis in growing plants.[31] Regardless of this, mature forests are still valuable carbon sinks, helping maintain balance in the Earth's atmosphere. Additionally, and crucially to life on earth, phytoplankton photosynthesis absorbs dissolved CO2 in the upper ocean and thereby promotes the absorption of CO2 from the atmosphere.[32]
Source and for further information on photosynthesis:
http://en.wikipedia.org/wiki/Carbon_dioxide
Literature connections
Trout are Made of Trees by April Pulley Sayre (Author) and Kate Endle (Illustrator) Published: Watertown, MA: Charelesbridge, c2008.
http://www.aprilsayre.com/2008/09/04/trout-are-made-of-trees/
Photosynthesis: Changing Sunlight into Food (Nature's Changes)by Bobby Kalman Published: Carbtree Publishing Company, c2005.
http://www.biblio.com/books/206068464.html
Art in Science
It is important to us as teachers that the students not only learn and retain the information on photosynthesis and energy flow but also that they enjoy the lesson and get to show their parents what they did in school. The Photosynthesis Diagram allows students to use their creativity to express the information they have learned about science and the world around us. This lesson plan was created to fit within a twenty minute block, however, if you have the time to have your students cut the different pieces of the model it is simple and fun to do. They will need to cut: oxygen, water, sun, a human, and a plant. The different pieces of the diagram can be different if you prefer a flower or a picture of the student rather than the human cut-out. Be Creative!
3a. Photograph shows the different pieces used to construct the model, including: white oxygen bubble, droplet of water, yellow sun, human figure, green plant.
3b. Photograph shows our construction of the photosynthesis model. Including: oxygen, water, sun, human, plant.
Multiple Intelligences
- When introducing students to new and somewhat frightening vocabulary it helps the students to become more comfortable, and therefore more likely to actively participate in the experiment. Since some students are linguistic learners, it is imperative that you approach subject material in a linguistic form. These linguistic learners will tend to excel in academic areas when words are effectively used.
- When having students build their model, it helping students who are Visual/Spatial learners, as well as Bodily/Kinesthetic learners. Visual and Spatial learners excel when they think in terms of physical space, this is done through models, puzzles, graphs and diagrams. When building the experiment, students are moving around the classroom, gathering materials and using their hands to complete the model. This is helping the bodily/kinesthetic learners for they like excel when they are moving, making and touching things. They communicate well through body language and be taught through physical activity and hands on learning.
- Since many of the students will be more apt to learn when logic and mathematical reasoning is involved, it is imperative to have your students make predictions of what will occur after the experiment takes place. Many logical/mathematical learners, think conceptually, abstractly and are able to see and explore patterns and relationships, they need to learn and form concepts before they can deal with details.
Necessary Vocabulary
The following are terms that will come up during the experiment. It may be helpful to define these before.
- Photosynthesis- the process that allows plants to take energy from the Sun and create food.
- Chlorophyll - the magic compound that can grab that sunlight and start the photosynthesis process.
- Oxgyen- Every living thing needs oxygen to survive. When you breath in, you take in oxygen.
- Carbon Dioxide- Another Chemical in the air you breathe. Plants take in CO2 and turn it into Oxygen!
Connections to educational standards
1.17.a. Express ideas in a variety of ways (e.g., words, numbers, symbols/notation, charts, tables, diagrams, models);
7.1.c. Create hypotheses for problems, design a "fair test" of their hypothesis, collect data through observation and instrumentation, and analyze data to draw conclusions; use conclusions to clarify understanding and generate new questions to be explored.
7.1.e. Explain a variety of observations and phenomena using concepts that have been learned;
7.3.b. Look for evidence that explains why things happen.
7.11.a. Demonstrate understanding that systems are made of interrelated parts that influence one another.
7.11.b. Demonstrate understanding that systems include inputs, processes and outputs.
7.13.c. Describe and show examples of the interdependence of all systems that support life (e.g., family, community, food chains, populations, life cycles, effects on the environment), and apply them to local systems;
7.13.d. Provide examples of change over time (e.g., extinction, changes in organisms).
7.15.a. Identify and record evidence of change over time (e.g., erosion, weathering, fossilization)
7.15.c. Identify and record the interrelated parts of earth systems (seasons, time, weather, etc.);
Next steps
After completing and working with your students on this experiment you can take the concepts they have learned and apply them to other things in your classroom. Why not create a fish habitat or aquarium? Maybe your class could start composting?
This is also a great time to talk with your students or remind your students that releasing organisms that are purchased (like the plants you used in your experiment) should never be release into the environment.
Reflections
Our group was motivated and excited to do this experiment and lesson plan with our students. However, after a few minor disasters we were unable to do it and had to use a previous group's experiment.
What Did Not Work:
- Plants were in aquarium for over a week and ultimately, died.
- Possibly not enough sodium bicarbonate the first time we assembled the model.
- New plants that were ordered came in frozen and did not produce enough oxygen over night.
Tips for Trying It:
- Access to pond with plants in the right season such as summer or fall when they are fresh and alive.
- Assemble the aquarium two to three days prior to running the experiment with students.
- Cheaper approaches: setting it up in pond water with free plants.
What Worked! Our group was fortunate enough to have the capacity to use a past group's experiment. Outrageous Ooze
We adapted their lesson plan to approach what we wanted to achieve with our students. We wanted to demonstrate states of matter and experiment through the scientific method. The lesson plan went as follows:
- Discussed the definitions of a solid and a liquid and had the students provide examples. We then wrote the students' answers on the board. We presented the students with "Ooze" and asked them whether they thought it was a solid or a liquid and why?
- The students defined on a slip of paper whether "Ooze" was a solid or a liquid and then put it on a chart. They made a prediction!
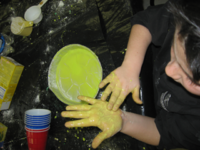
- We had the students make their own Ooze and after it was made we asked them several questions to test whether it was a solid or a liquid. Pinch It, Poke It, Punch It, Make a Snowman with It, Put your Hand in It!
- We moved to a cleaner table and then reviewed the properites of "Ooze" and the students had the opportunity to change their answer. Most students said that "Ooze" was both a solid and a liquid, and they were right! One student commented that it was a "Soliquid". The students then understood that they were scientists and had tested "Ooze" to determine its state!
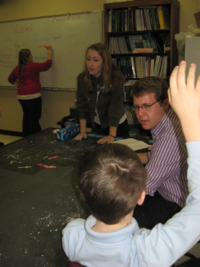
4.a This is the first step in our lesson plan, which is discusing the definitions of a solid and a liquid.
4.b This is the second to last step in our lesson plan, where a student is shown making his own ooze.
Citations and links
- Churchill, Richard E. Loeschnig, Louis V. Mandall, Muriel. 730 Easy Science Experiments: with everday materials.New York: Tess Press, 2004. (Experiment #251).
- Press, H.J. A Little Giant Book: Science Experiments.New York: Starling, 1998. (Experiment pg. 263).
- Found suggested amount of a few tablespoons of sodium bicarbonate from:
http://blogs.asee.org/goengineering/bubbling-plants/
- Howard Garnder "Garnder's Multiple Intelligences"
- Carbon Dioxide and the Chemistry of Photosynthesis:

